Introduction
In this second devblog post, I will share the progress made on the Real Engine project since the first post. The focus has been on setting up the project structure, choosing a programming language, and implementing the initial rendering system.
What is OpenGL?
OpenGL (Open Graphics Library) is a cross-platform graphics API that provides a set of functions for rendering 2D and 3D graphics. It is widely used in game development, simulations, and other applications that require high-performance graphics rendering. It provides a low-level (but not the lowest!) interface to the graphics hardware, allowing developers to create visual effects (with shaders, textures, and transformations) and render graphics.
What is GLFW?
GLFW (Graphics Library Framework) is a library for creating windows with OpenGL contexts and managing input (keyboard, mouse, etc.). It is designed to be simple and easy to use, making it a popular choice for game developers and graphics programmers. GLFW provides a cross-platform API for creating windows, handling input events, and managing OpenGL contexts. The reason for choosing GLFW for the Real Engine project is its simplicity and ease of use, which allows for quick prototyping and development of the engine.
What is ImGUI?
ImGUI (Immediate Mode GUI) is a bloat-free graphical user interface library for C/C++. It is designed to be easy to integrate into existing applications and provides a simple way to create user interfaces for tools, editors, and games. ImGUI is particularly useful for debugging and development tools, as it allows developers to quickly create UI elements without the need for complex layout systems or event handling. It is often used in conjunction with OpenGL to create real-time user interfaces.
What is Immediate Mode Rendering?
Immediate Mode Rendering is a simple way to render graphics where the application directly specifies the vertices and their attributes (like position, color, texture coordinates) to the graphics API (like OpenGL, and not fully DirectX) in real-time. This has its advantages, such as simplicity and ease of use, especially for prototyping and small projects. However, because it requires the application to send data to the GPU every frame, it can be less efficient for larger scenes or complex objects.
Project Setup
The project has been set up in a new repository on GitHub. The initial structure includes directories for:
- Engine (for the core engine code)
- External (for third-party libraries)
- Sandbox (for testing)
I also added CMake files to manage the build process. The project is structured to allow for easy expansion in the future. Each directory has its own CMakeLists.txt file, which makes it easier to manage dependencies and build configurations.
Inside the Engine Directory
The Engine/ directory contains the Core/, Renderer/, and Shaders/ subdirectories. The Core/ directory will hold the main engine logic, such as the main loop and input handling. The Renderer/ directory will contain the rendering code, including shaders and rendering pipelines. The Shaders/ directory will hold the shader files (*.frag, and *.vert) used by the engine.
Image: 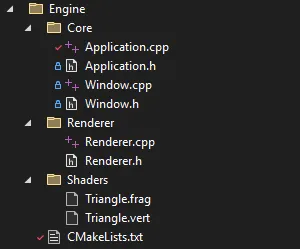
Creating a Window
The first step in the engine development was to create a window where the engine can render 3D content. Inside the Engine/Core directory, I created a Window class that initializes GLFW and creates a window.
The constructor of the Window class initializes GLFW, creates a window, sets up the OpenGL context, and enables V-Sync.
Window::Window(int width, int height, const char* title) {
    if (glfwInit() == GLFW_FALSE)
        throw std::runtime_error("Failed to initialize GLFW");

    m_Window = glfwCreateWindow(width, height, title, nullptr, nullptr);
    if (!m_Window) {
        glfwTerminate();
        throw std::runtime_error("Failed to create GLFW window");
    }

    glfwSetWindowPos(m_Window, 500, 500);

    glfwMakeContextCurrent(m_Window);
    glfwSwapInterval(1);
}
The code is pretty straightforward, but I want to highlight two important lines:
glfwMakeContextCurrent(m_Window)line, which sets the current OpenGL context to the created window. This means all subsequent OpenGL commands affect the framebuffer of that window, which is essential for projects that may involve multiple windows.glfwSwapInterval(1)line, which enables V-Sync, ensuring that the frame rate is synchronized with the monitor’s refresh rate. To reduce screen tearing and GPU usage. They are essential for rendering.
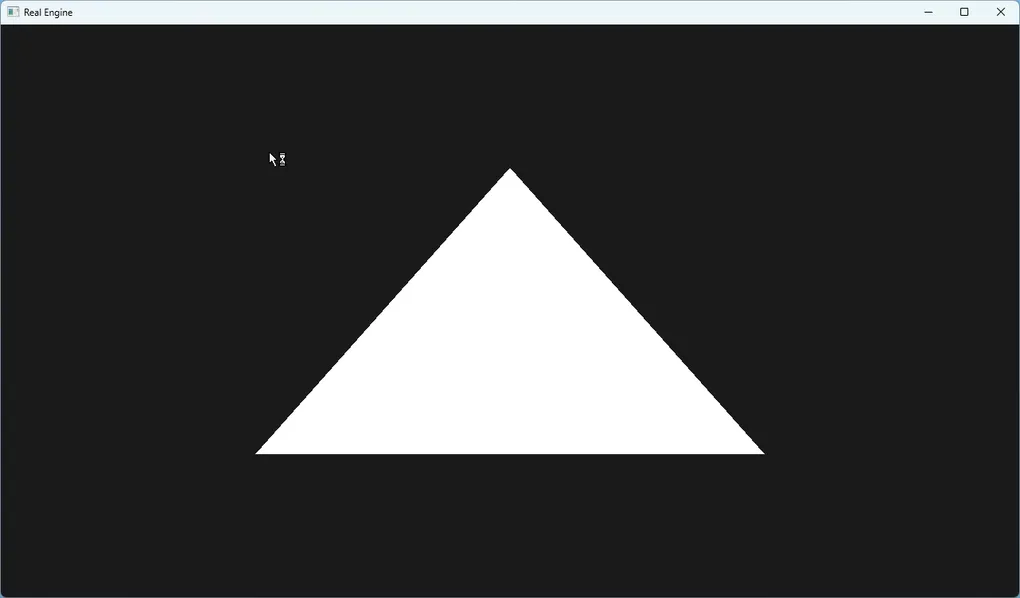
Rendering a Triangle
The next step was to implement a basic rendering pipeline that can draw a simple triangle on the screen. This involved creating a vertex buffer (VBO), a vertex array object (VAO), and a shader program.
What is a Vertex Buffer Object (VBO)?
A Vertex Buffer Object (VBO) is an OpenGL feature that allows developers to store vertex data (like positions, colors, and texture coordinates) in the GPU’s memory. This improves performance by reducing the amount of data that needs to be sent to the GPU every frame. VBOs are used to store vertex attributes that are used in rendering.
What is a Vertex Array Object (VAO)?
A Vertex Array Object (VAO) is an OpenGL object that encapsulates the state needed to specify vertex data. It stores the configuration of vertex attributes (like position, color, and texture coordinates) and the associated VBOs. VAOs allow developers to switch between different vertex configurations easily without having to rebind VBOs every time.
Why do we separate Vertex Buffer Objects (VBOs) and Vertex Array Objects (VAOs)?
Separating VBOs and VAOs allows for better organization and flexibility in rendering. VBOs store the actual vertex data, while VAOs store the configuration of how that data is interpreted. This separation allows developers to reuse VBOs with different VAOs, better managing memory thus improving performance. It also allows for easier switching between different vertex configurations without having to rebind the VBOs every time. In my case, inside the Renderer class, I created an array of vertices for a triangle:
float vertices[] = { // triangle
    -0.5f, -0.5f,
     0.5f, -0.5f,
     0.0f,  0.5f
};